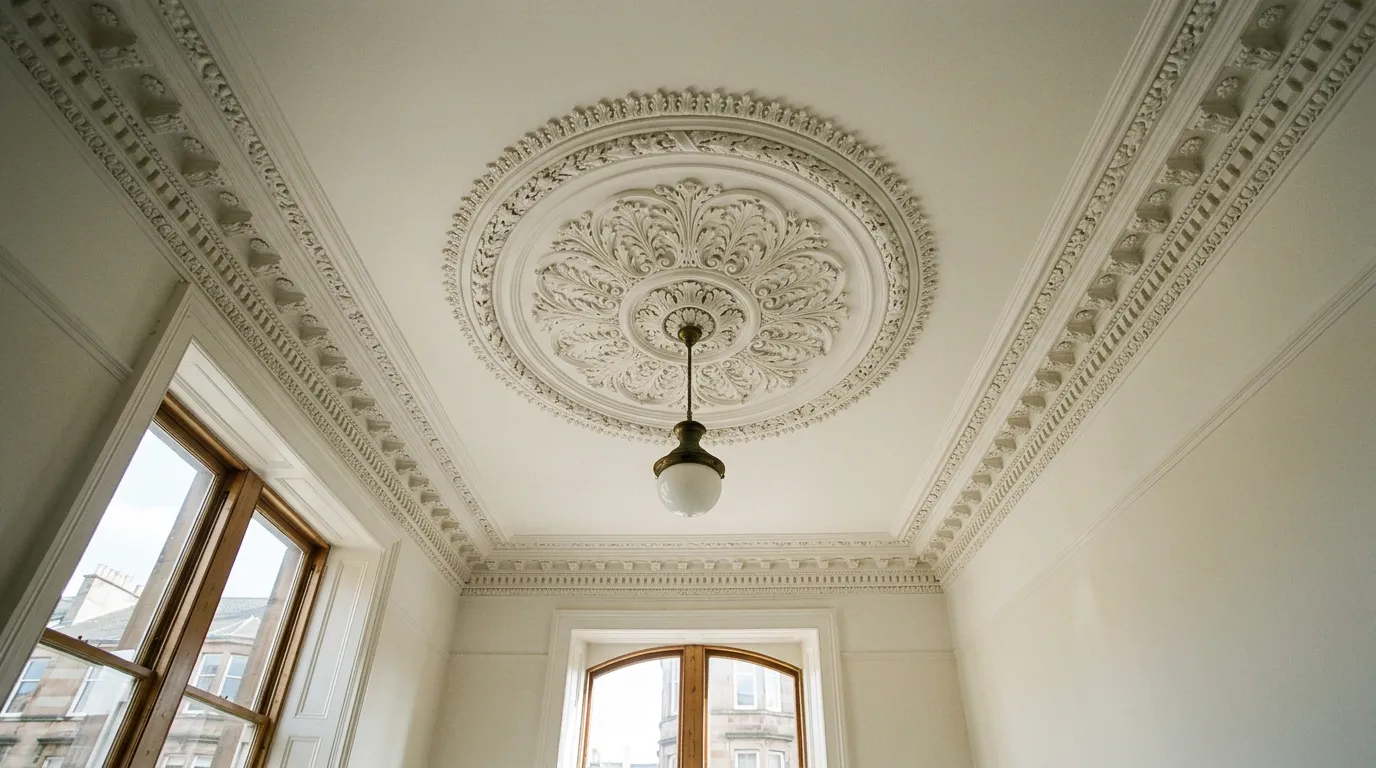
A clogged tenement cornice is usually emulsion over old distemper. Washing it back to plaster and repainting thinly takes about 2.5–6 days for a typical room, depending on detail. At Glasgow and Scottish day rates of £150–£290 (BestBuilders, Aug 2026; Trade2Base, Jun 2026), that is roughly £375–£1,740 in labour before materials.
The plaster cornice and ceiling rose are often the finest things in a Glasgow tenement room, and they are usually the worst treated. After a hundred years of quick redecoration, many are buried under so much paint that the leaves, egg-and-dart and beading have turned into soft lumps. This guide explains what is on your cornice, when it should be cleaned back rather than painted over, how the work is done safely, and what it costs in time and money.
What is actually on your cornice?
Before anyone picks up a brush, it helps to know what the layers are, because each one behaves differently. In a typical Victorian or Edwardian flat you will find some or all of these, from the plaster outwards:
- Lime plaster. Most tenement cornices were run in place with a profiled template, in lime or lime-and-gypsum plaster. Ceiling roses and the enriched parts of a cornice (leaves, flowers, brackets) were usually cast and fixed on.
- Soft distemper. Historic Environment Scotland’s Engine Shed guidance describes soft distemper as “a pigmented, water-based matt paint”, made from chalk bound with animal glue. It was the normal finish for ceilings and cornices for well over a century. It stays soft and powdery, and it dissolves in water.
- Oil paint or oil-bound distemper. Sometimes used on cornices in better rooms and in closes. It is harder, and older coats may contain lead.
- Modern emulsion. Several coats from the 1960s onwards, often rolled straight over the distemper.
The trouble usually starts at that last step. Distemper is chalky, so emulsion laid over it only grips the loose surface. It looks fine for a while, then cracks into a crazed pattern, curls at the edges or falls off in flakes when the room is next washed down or redecorated. If your cornice has fine cracks running in every direction, or paint peeling in curls from the ceiling edge, distemper underneath is the most likely cause.

A quick test you can do
Find an out-of-the-way spot, such as the cornice above a press door. Wet a cloth with warm water and rub a small area for a minute. If the cloth turns white and the surface softens, there is distemper at or near the top. If nothing comes off, you are looking at emulsion or oil paint. Scrape very gently at a flake that is already loose and look at the edge: a thick stack of colours tells you how many times the room has been painted.

Lead in older layers
The British Coatings Federation’s guide Lead in painted surfaces (HS032, December 2015) says lead pigments “were taken out of most paints in the 1960s” and fully removed from decorative paints “by the early 1980s”. So a cornice painted before the 1960s may have lead somewhere in its layers, most often in any oil-based coats. The same guide says the risk comes when the paint is “unsound or disturbed”, and that sound paint is safest overcoated rather than removed. We treat any pre-1960s layer as possibly leaded until a test says otherwise. More on this in the steps below.
Should you clean the cornice back or just paint over it?
Not every cornice needs stripping. The right answer depends on how much detail is lost and how sound the paint is. This is the decision we work through on a visit.
| What you see | What it usually means | Sensible approach |
|---|---|---|
| Crisp detail, paint sound, no cracking | Few coats, well bonded | Wash down, fill hairline cracks, two coats of paint |
| Detail softened but readable, paint sound | Several emulsion coats | Repaint with a thin, breathable finish; consider stripping only the worst runs |
| Crazing, curling flakes, powder on your fingers | Emulsion over distemper | Wash off back to plaster. Painting over will fail again |
| Leaves and beads reduced to blobs | Heavy build-up, often mixed layers | Strip by hand with water, steam or poultice; then repaint |
| Sections missing, cracks across the whole profile, sagging | Plaster damage, possibly a leak or failed lath | Plasterer first, decorator after |
Conservation writers are cautious about stripping, and for good reason. Richard Ireland’s article “Cleaning Decorative Plaster” (Building Conservation, from Historic Churches, 2005) puts it plainly: “Excessive paint build-up obliterates fine decorative detail”, but removal can also damage the surface underneath. The aim is to take off what is hiding the detail, not to scrub the plaster back to raw.

Decorator’s tip: if the ceiling paint is flaking at the edges but the middle is sound, the cornice is often the source. Fixing the ceiling alone and leaving distemper on the cornice means the flaking comes back along the edge within a year or two.
Is your flat listed?
Many Glasgow tenements are listed buildings. Historic Environment Scotland’s consents guidance says “internal alterations that affect the character of the building” will almost certainly need listed building consent. Washing and repainting a cornice is maintenance. Removing original plasterwork, or replacing a damaged rose with a different design, can go further than that. If your building is listed and the work is more than cleaning and painting, check the current position with Glasgow City Council’s planning service before acting.
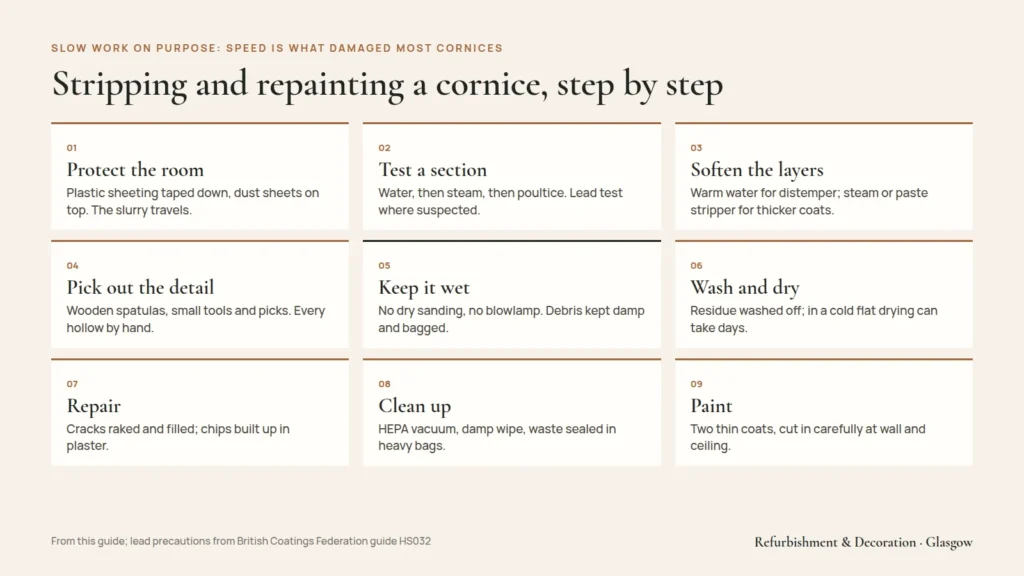
How we strip and repaint a clogged cornice, step by step
This is the method we follow for a cornice and rose with distemper and emulsion on top. It is slow work, and that is the point: speed is what damaged most cornices in the first place.
- Protect the room. Floor and furniture under plastic sheeting taped at the edges, with dust sheets on top so the floor is not slippery. Washing distemper off a ceiling is wet and messy, and the slurry travels.
- Test a section. We try plain warm water first, then steam, then a poultice stripper on a short length, and use the gentlest method that works. Where we suspect lead, a test kit or lab sample comes first. The BCF guide notes that home test kits can give false negatives, so a negative result on old paint is not the end of the question.
- Soften the layers. Distemper responds to warm water and a soft brush. Emulsion over distemper often lifts once the distemper underneath is wet. Thicker emulsion and oil coats need low-pressure steam or a paste stripper laid on under a paper or film covering and left to work.
- Pick out the detail. Softened paint comes away with wooden spatulas, plasterer’s small tools, dental-style picks and stiff brushes. Every hollow of the egg-and-dart is cleared by hand. Metal scrapers are kept to the flat runs.
- Keep it wet, never dusty. Following BCF HS032, we never dry sand old paint, never use a blowlamp, and keep all debris damp. Residue is wiped off with damp cloths and bagged.
- Wash and let it dry. The plaster is washed down to remove stripper and glue residue, then left to dry fully. In a cold Glasgow flat in winter that can take several days with the heating on.
- Repair. Fine cracks are raked out and filled. Small chips in mouldings are built up with a suitable plaster. Larger losses go to a plasterer (see the next section).
- Clean up properly. A HEPA-filtered vacuum over all surfaces, a damp wipe, and all waste sealed in heavy-duty bags.
- Paint. Two thin coats, cut in carefully at the junction with the wall and ceiling. On bare lime plaster we use a breathable finish (see “Which paint for a cornice” below).
Which paint for a cornice?
Thin is everything. Every coat you add softens the detail a little more, so the finish should be as thin as it can be while still covering. Your realistic options:
- Soft distemper. The traditional finish. Very breathable and very thin. The Engine Shed’s guidance recommends soft distemper or limewash on walls plastered straight onto masonry because they allow “maximum permeability”. The downside: it marks easily and is not washable, and Farrow & Ball’s own data says its Soft Distemper will not take modern paints on top later.
- Contract or breathable matt emulsion. The Building Conservation article notes that contract emulsion is among the more vapour-permeable modern paints, and vinyl emulsions less so. A good flat matt in two thin coats is the practical choice for most flats.
- Vinyl matt or silk. Avoid on cornices. More build, less breathable, and a silk sheen shows every ripple in old plaster.
If you are not stripping and need to paint over old distemper you cannot fully remove, a penetrating stabilising sealer can bind the surface first. Always try it on a test patch. In our experience it is the second-best option, behind washing the distemper off.

Picking out in colour
Some owners like the cornice in a slightly different shade from the ceiling, or the rose picked out in two tones. It can look very good in a high Victorian room, but it doubles the cutting-in time and it shows every wobble. If you want it, choose shades close in tone, and decide before the quote so it is priced in. Our guide to paint colours for Scottish light covers how whites and off-whites read in north-facing tenement rooms.

Cracks, missing sections and when to call a plasterer
A decorator can fill hairline cracks and small chips. Some damage needs a plasterer with cornice skills. These are the signs we look for:
- Cracks along the line where the cornice meets the ceiling or wall, opening and closing with the seasons. Usually movement. Fill with a flexible filler and expect it to need attention again.
- A crack running across the whole profile, with one side lower than the other. The cornice may be coming away from its backing. This needs a plasterer before anyone paints.
- Missing lengths, often where a wall was knocked through or a pipe was run. These are repaired by running a new length in place with a template cut to match, or by casting from a mould taken from a good section.
- Brown staining or crumbling plaster, often below a bathroom or near a gutter. Fix the water first. Paint over a damp patch fails, and stain comes back through emulsion unless it is sealed with a stain-blocking primer once dry. See our guide to damp, condensation and mould.
- A loose or sagging ceiling rose. Roses were fixed to the ceiling plaster and lath. If it moves when gently pressed, it needs refixing or support before cleaning. Do not hang a heavy light fitting from an old rose.
Where a plasterer is needed, we sequence the job so the repair goes in after stripping and before painting, and allow drying time for fresh plaster before it is decorated.

What does cornice and ceiling rose work cost, and how long does it take?
There is no published Scottish price per metre for cleaning cornice. We looked, and found nothing reliable. What can be sourced is the day rate. Glasgow and Scottish decorator day rates run at about £150–£290 a day (BestBuilders Glasgow, August 2026, and Trade2Base Scotland, June 2026). Trade2Base also lists a specialist coving and cornice rate of £250–£380 a day across the UK (June 2026). So the real question is how many days your cornice will take.
| Job (one typical tenement room, about 4.5 × 4 m, 3.2 m ceiling) | Typical time | Labour at £150–£290 a day |
|---|---|---|
| Wash down and repaint sound cornice and ceiling | 1–1.5 days | £150–£435 |
| Wash distemper off cornice and ceiling, repaint | 2.5–3.5 days | £375–£1,015 |
| Strip heavy emulsion build-up from enriched cornice and rose, repaint | 4–6 days | £600–£1,740 |
| Ceiling rose only, cleaned back and repainted | 0.5–1 day | £75–£290 |
These are worked arithmetic from the sourced day rates, not R&D’s prices. Materials, a scaffold tower or platform for high ceilings, and any plasterer’s work are on top. The time ranges are our own estimates for a typical room; a plain run-in cornice clears far faster than one with leaves and brackets.

Worked example: a typical front room
Take a typical Southside tenement front room: 17 metres of cornice with an egg-and-dart band, a 600 mm ceiling rose, and emulsion crazing over distemper. Day one goes on sheeting the room, testing and washing down the ceiling. Days two and three go on the cornice, working round in sections. Day four covers the rose, washing down and filling. After drying, day five is two coats on ceiling and cornice. Five days at £150–£290 is £750–£1,450 in labour on the market range, before materials and walls. If the walls are being painted at the same time, much of the setup is shared, which is why cornice work is best done as part of a full room. Our Glasgow painting price guide has full room prices.

Decorator’s tip: cornice work is a good winter job. It is all indoors, it is not affected by weather, and decorators’ diaries are often quieter. Just allow longer drying times in a cold flat.
Mistakes to avoid with cornicing and roses
- Rolling emulsion over distemper. The single most common cause of flaking ceilings in Glasgow flats.
- Dry sanding old paint. Creates fine dust, possibly leaded, and rounds off the detail. BCF HS032 lists dry abrasion of lead paint as a “do not”.
- Using a heat gun or blowlamp on a cornice. Heat can scorch plaster, crack old repairs and release fumes from leaded paint. The BCF guide says never use blowlamps or gas torches on lead paint.
- Strong caustic strippers left too long. The Building Conservation article warns that alkali pastes can leave salts in porous plaster and hide the detail you are trying to protect.
- Filling detail with filler. Ready-mixed filler pressed into a moulding to “tidy it” leaves a blob. Missing detail needs plaster shaped to the profile.
- Thick, glossy paint. Silk and vinyl finishes add build and show every flaw. Keep it thin and matt.
- Painting before the plaster is dry. After washing, the plaster holds a lot of water. Paint over it too soon and you get blistering and poor adhesion.
- Working from a stepladder. On a 3.2 m ceiling you need a platform or tower to work steadily along the cornice at arm’s height. It is safer and gives a better line.

For the rest of the room, our complete guide to painting a Glasgow tenement flat covers high ceilings, lath-and-plaster cracks, lining paper and the order of work. If the sash windows need attention too, see painting sash windows in a Scottish flat.
Getting a price for your cornice work
Cornice work is hard to price from a photo, because the time depends on what is under the paint. We can give you a guide price on the phone from a description and a few pictures, then a fixed written quote after a free visit, where we test the layers and look at the plaster. We cover Glasgow and Central Scotland, and cornice restoration is usually part of our interior painting work. Call 07777 780557 or book a free visit.
Questions people ask
Why is the paint on my cornice cracking and flaking?
In most Glasgow tenements the cornice was finished in soft distemper, a chalky water-based paint. Later emulsion was rolled straight over it and only grips the powdery surface, so it crazes, curls and flakes. Painting over again will fail the same way. The lasting fix is to wash the distemper off back to sound plaster, let it dry, then repaint with two thin coats.
Is it safe to sand the old paint off a cornice?
No. Dry sanding rounds off the detail and creates fine dust, and paint applied before the 1960s may contain lead. The British Coatings Federation guide HS032 advises against dry abrasion, blowlamps and gas torches on lead paint, and recommends keeping all debris wet. We soften the layers with water, steam or a poultice stripper and pick the detail out by hand.
How much does it cost to restore a cornice in Glasgow?
There is no reliable published price per metre in Scotland, so it comes down to days. Decorator day rates in Glasgow and Scotland run about £150–£290 (BestBuilders, Aug 2026; Trade2Base, Jun 2026). Washing distemper off a typical room's cornice and ceiling takes about 2.5–3.5 days; heavy build-up on an enriched cornice can take 4–6. Materials and plaster repairs are extra.
Do I need permission to strip or repair a cornice in a listed flat?
Washing and repainting is ordinary maintenance. Historic Environment Scotland says internal alterations that affect the character of a listed building will almost certainly need listed building consent, so removing original plasterwork or replacing a rose with a different design may need it. Check the current position with Glasgow City Council's planning service before acting.
Can a decorator repair missing sections of cornice?
A decorator can fill hairline cracks and small chips. Missing lengths, cracks right through the profile or a cornice pulling away from the ceiling need a plasterer, who runs a new length in place with a matching template or casts from a mould taken from a good section. We plan the job so plaster repairs go in after stripping and are dry before painting.
What paint is best for a ceiling rose and cornice?
The thinnest finish that covers. Soft distemper is the traditional, most breathable choice but marks easily and cannot take modern paint later. A good contract or flat matt emulsion in two thin coats suits most flats. Avoid silk and vinyl finishes, which add build, are less breathable and show every ripple in old plaster.

Painters and decorators working across Glasgow & Central Scotland, specialising in interior painting and wallpaper hanging. Prices in our guides are reviewed every year.
 Painting New Plaster: Mist Coats, Drying Times & Mistakes to Avoid
 Cracked Ceiling Repair & Painting: What a Decorator Can Fix
 Painting a Tenement Close: Factors, Owners & Costs